Hello hungry peoples,
This is it……..Cake Day. Dum dum duuuuuuuuum! Actually cake day is two days. I am baking the cake and making the chocolate decorations on Day 1. Day 2 is all about decorating. Last weeks birthday cake taught me that it will take way longer than I think it will and I want plenty of wiggle room.
Day 1: The Cake
My sister requested a red velvet and chocolate cake combo. After the time it took last week I simplified to just red velvet. I decided to go with this recipe because it looked pretty and is in the New York Times. Fancy and intellectual! I am sure smart tastes better.
I bought a small cake pan for the top layer and a larger pan for the base. First off I should have read the recipe closer. This recipe makes layers rather than a whole cake. I had doubled the mix to make sure I had enough cake for the tiers and I still fell short. This was mostly due to the cake not puffing up at all. I ended up with a very short stumpy cake even with piling it all on top of each other.
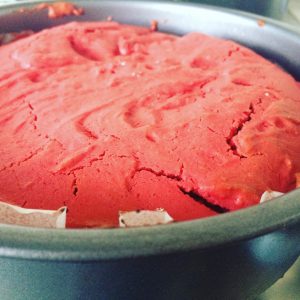
I looked at it in dissatisfaction for quite awhile. This was not going to be an impressive cake. A myriad of ways to fix this presented itself before me but my basic problem was always going to be that I did not have enough cake. So chocolate layers came back on the table. I figured if I could get a nice puffed up chocolate cake, I could layer it with the dense red velvet layers to create a towering beauty.
I decided to go with this recipe as it is what popped up when I googled “easy chocolate cake”. I also doubled the amounts. I am not baking any more cake today. Technically I have made the batter for the equivalent of 4 large cakes and I am exhausted. I am also out of eggs.
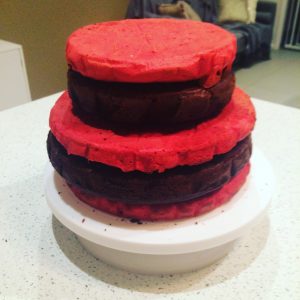
Lastly once my cakes had cooled I used short wooden skewers to stick them together, alternating chocolate and red velvet cake. I did chop the top off my chocolate cake as it was a bit bulbous and then placed it cut side down to create a flat top. I probably should have waited for the icing before construction so that I could add creamy layers but I was not thinking rationally at this point.
Day 1: The Decorations
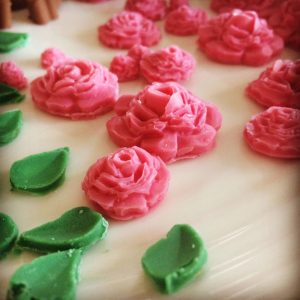
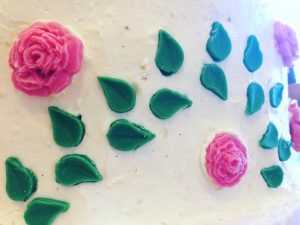
The plan with the decorations is that they will be made from chocolate using a variety of molds. I am going to create green leaves, pink roses, as well as some Minnie Mouse cake toppers. After last week’s adventures with using double boilers I decided to just microwave the chocolate for my decorations.

I thought I would be even smarter microwaving my chocolate in sandwich bags so I could snip a corner off and pipe straight from them. Those bags are microwave proof…..right? NO, NO THEY ARE NOT! It turns out that the bags will melt and the hot chocolate will pour out. It took me two goes to realise this. Sigh.

When microwaving chocolate don’t run it more than 30 seconds a go. You will probably have to microwave it more but it is really easy to burn. Just check every 30 seconds and give it a stir to see if it is melted. The chocolate melts are tricksy. Sometimes they hold there shape perfectly even though they have entirely melted. This also took me awhile to figure out. Sometimes my brain seems to be all like “Dude I am out, good luck lady!”.
I finally filled all of the molds and then had a another “I don’t have enough” moment. From now on I am going to quadruple everything…..just to make sure. I went back to microwaving chocolate and refilled all of the molds once they had set. That’s it, Day One complete. Sadly it really did take all day. I guess this is why people charge a lot for cakes. Let’s take stock. I ended up with 1 large chocolate cake, 2 red velvet cake layers (the equivalent of 1 cake), 1 small chocolate cake, 1 small red velvet cake, 25 chocolate pink roses, 4 cake toppers and 32 chocolate leaves. I am going to have a lie down now.
Day 2: The Icing
After my previous dissatisfaction with American buttercream I decided to try something completely different. The New York Times red velvet cake also had an icing recipe, the unusual Ermine icing, which is also called boiled milk frosting. Apparently it is an old fashioned recipe that was originally served with red velvet cake. First I made a pudding from heating milk with flour, which was then whipped into butter and sugar. This was one of the great successes of the day. The icing has the texture of whipped cream, with the taste of an excellent frosting and a beautiful crisp white colour. It was also great to work with. Definitely a keeper.
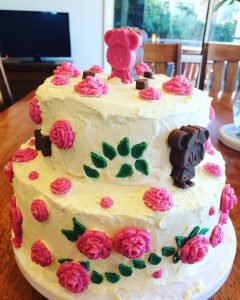
I put a first coat all over my tower of cake, trying to fill in any large gaps using a cake spatula. I then set about doing a final second coat, taking care to evenly distribute everything. The icing seemed to ‘set’ quite quickly, possibly due to the Canberra winter. This was great as it was really easy to make any additions to the coating and I didn’t have to worry about things sliding around. Lastly I placed all of my chocolate decorations, using a bit of icing on the back of the bigger ones. Unlike last week the cake actually turned out as I imagined and the final stage was a lot more smoother. Hurrah!
The Final Assessment
Lets start with lows and end on a high. Sadly I am still in search of amazing cake recipes. None of them were as delicious and as impressive as I hoped, being very flat and dense. While the cake was a magnificent tower, baking five cakes to get there is just plain ridiculous. The coloured melts are made of very cheap chocolate. In future with the chocolate decorations I think I will invest in some high quality cooking chocolate like Lindt. I’ll have to be organised and get powders for colouring. Since the whole thing is a huge amount of time, effort and money, this will probably be worth the investment. The cake ended up weighing a tonne and transportation felt dicey. I had to empty one of my giant plastic linen tubs because it wouldn’t fit in my slightly less giant cake box. By far the hardest part was keeping my kids from eating all of my decorations. It is really hard to explain to a two year old that he has to wait for cake.
Moving onto highs, the chocolate decorations came out a lot easier this time and looked gorgeous. I kept my lines cleaner and the bright colours of the chocolate against the white was stunning. I am seriously in love with the Ermine icing. I did manage to transport the behemoth successfully too, which surprised me. Overall I made a very pretty cake and I am suitably proud of it. It was also a very fun exercise. I guess I just need to make and decorate a cake every week to become an expert. This is not going to happen. For one thing I will become a huge cake eating machine. I might go on a quest to find amazing cake recipes though so I have one for next time. This idea I like. If you have an amazing recipe you want to share send it my way. I think I will aim for one recipe a month, first weekend of the month. Let the cakening begin! Muahahahahaha.