Hello hungry peoples,
Sushi has always daunted me. I think its because it seems like a whole new skill set associated with a culture I am not that familiar with. Turns out four years of high school Japanese is not really sufficient grounding to be a sushi expert.
Konichiwa. Watashi wa Karen san desu. Ikura desu ka
Hello, my name is Karen. How much is it?
4 YEARS people and that is it. I’m not even sure I spelled it right.
When I was too scared to make my own, my favourite place to get my sushi fix was, and still is, Mee’s Sushi in Manuka. I easily eat here once a week, sometimes more. Their signature dish is a chicken schnitzel sushi, which doesn’t seem very authentic but is unbelievably delicious. If you are ever in the area check it out. If you can’t get there I have some comforting news for you: I know how you can make your own.
This is my copycat Mee’s Chicken Schnitzel Sushi . I know, I know…..I’m excited too. Lets get into it.

Once you attempt to make sushi you realise that, much like cooking pasta, there are some fairly simple rules It really isn’t that hard. To make sushi all you really need to do is make one trip to an asian grocery near you. There are even sushi kits for sale in Coles and Woolworths if you can’t be bothered doing this. I’m loving the expanded international sections of these stores but you really can’t beat rummaging in an asian grocery. I always end up buying a whole heap of random stuff and have come across some great gems. My favourite asian grocery is my local Mani Asian Supermarket. They have a really great range of well…pretty much everything and have been super accommodating, as I am ALWAYS asking them annoying questions. “Why is there no coconut motchi? Why???????”. The girl serving me even gave me a quick lesson in making sushi when I was trying to work everything out.
Copycat Mee’s Chicken Schnitzel Sushi
Ingredients
- 3 cups sushi rice
- 2 chicken thighs
- 6 tbsp Kewpie mayonnaise
- 2 cups Panko breadcrumbs
- 2 eggs
- 1/2 cup rice vinegar
- 2 tbsp sugar
- 2 tsp salt
- Handful green salad leaves
- 3 yaki nori seaweed sheets
- 500 ml vegetable oil
For dipping: soy sauce, wasabi (if your brave)
Tools: Bamboo sushi mat
Cooking Directions
- Firstly you need a bamboo mat. These are dirt cheap and help a lot with rolling the sushi. Definitely worth the investment. Secondly don’t cheat with the rice. You wouldn’t make risotto with normal rice and for this you need SUSHI rice (“Shari”). What you are looking for is white short grained rice. It is also generally translucent and rounded. Just ask at the supermarket and they will point you in the right direction. Usually all the sushi stuff is together.
- Ok, now things get controversial (bah bah baaaaaaaah!). To wash or not wash the rice. I am firmly in the no camp. Washing the rice used to be essential as commercial rice was produced with talc and you definitely want to wash this away as it produces a…surprise surprise…… chalky rice. Apparently in some parts of the world they still do this, including Japan, as it keeps the rice nice and dry. Generally people wash rice now to remove some of the starch to make the rice less sticky. The thing with sushi though is it will hold together better if the rice is stickier. I would make your life easier and not wash. Addendum: If your rice looks dirty and chalky maybe you should wash it. I am such a flim flammer. If you do wash you don’t have to keep doing it until the water is clear. It will never go entirely clear, just aim for clearer.
- To get started we need to cook the rice as this will take the longest. If you have a rice cooker, great! You should use it. I do not and this is how I get perfect rice *nearly* every time. My mother-in-law taught me this, so props to her. Put the sushi rice into a small pot and fill with water to an inch above the rice. Put the pot on a high heat and leave until heat funnels form in the water and rice. Put a lid on the pot and turn it down to low heat. That’s it. You leave it alone for around 10-15 mins. No stirring, no messing around. The rice is cooked when the rice on top of the pot is not chewy or hard any more. Simple, right? Some of the rice in the bottom of the pan may go a bit brown and crunchy. Don’t eat this, it is gross and the wrong texture for the sushi.
- While the rice is cooking we prepare the chicken. Put the oil in a large based pot. Just fill it until the chicken will be floating in the oil, not sticking to the base, and put it on high heat.
- Whisk the eggs to make an egg wash.
- Place the Panko breadcrumbs on a plate and season with some salt and pepper. You could use regular breadcrumbs, which is a perfectly acceptable substitute, but Panko bread crumbs are more traditional. They also tend to be larger than regular breadcrumbs, producing a crunchier texture.
- Slice the chicken thighs into strips, about 1.5 cm wide. Dip the chicken in the egg wash and then coat in the Panko breadcrumbs.
- Put the chicken strips into the hot oil. By the time you have done the prep the oil should be nice and hot. The chicken should by bubbling and cooking furiously. Do this in batches so the oil stays nice and hot. The chicken will not take long to cook.
- Once it is looking golden take it out and drain on some paper towel. Cut one open just to make sure it is cooked through but it should be all good. Make sure you eat one just to doubly make sure they are delicious. Hmmmmm, fried chicken.
- Now to finish off the rice. Mix the 1/2 cup rice vinegar, 2 tbsp sugar and 2 tsp salt together to make the rice seasoning. Put it in the microwave for 45 seconds to help dissolve everything. The heat of the rice will also help with this, so you can skip this step if you are feeling lazy. Take the rice off the heat and mix the seasoning in. Traditionally you do NOT do this with a metal spoon as some say it breaks the rice and reacts with the vinegar.
- In theory you want the rice to cool before you roll it. Personally I like my sushi warm when it contains fried chicken so I don’t leave it very long.
- Now to rolling: get out your bamboo rolling mat. Place a sheet of the dried seaweed on the mat. There will be a rough side to the seaweed and a smooth side. Place the rough side upwards.
- Cover with a 0.5 cm layer of rice, leaving the top 1 inch of the seaweed sheet free. If you are going to be well behaved use wet hands to place the rice (the wetness prevents sticking).
- Place a line of filling on the rice along the base. In this case I place a line of chicken strips, some baby spinach and drizzle the Kewpie mayonnaise on top. Don’t skimp on the mayonnaise as it makes it amazing. Kewpie mayonnaise is a Japanese mayonnaise made using rice vinegar. It is rich, creamy and ridiculously popular in Japan. It does contain MSG though so avoid it if you are concerned about such things. I am not, the MSG is tasty as heck.
- Sushi is similar to burritos in that if you overfill them they are a nightmare to roll so try to be conservative with the fillings. Start rolling the sushi from the bottom, using the bamboo sheet to guide the seaweed sheet. The trick I have found is to put a fair amount of pressure on the mat as you roll. If the sushi is rolled tightly it is unlikely to come undone.
- There are two traditional sushi roll shapes; round or square. Round is probably the easiest so stick with this for your first go. Once it is rolled you can cut the roll in half to create the traditional sushi roll size. That’s it, you are done! See..that wasn’t so bad.
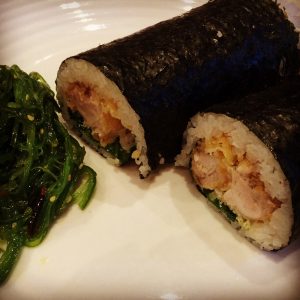
Copycat Mee’s chicken schnitzel sushi
Difficulty: A bit hard the first time but you will be a pro in no time
Great tip re wet hands, I'll try that next time.
We are super lazy, and make our sushi with the pre-cooked chicken schnitzels from woolworths. Ten minutes in the oven, then slice them up. The southern fried style is especially yum. (Kristy)